
- You are here:
- Home »
- Indoor Plants
- » Bird’s Nest Fern Care Guide

Bird’s Nest Fern Care Guide
Indoor plants not only beautify our living spaces but also contribute to our well-being by purifying the air and creating a soothing atmosphere. Among the plethora of options available, Bird’s Nest Fern stands out for its unique appearance and low maintenance requirements. This article delves into the intricate details of Bird’s Nest Fern, exploring its botanical characteristics, historical and cultural significance, common names, and varieties.
Contents
- 1 What Is Bird’s Nest Fern?
- 2 Botanical Characteristics
- 3 Historical And Cultural Significance
- 4 Common Names And Varieties
- 5 Light Requirements
- 6 Soil Requirements
- 7 Temperature Requirements
- 8 Humidity Requirements
- 9 Watering Needs For Bird’s Nest Fern
- 10 Fertilization
- 11 How To Plant Bird’s Nest Fern
- 12 Potting
- 13 Pruning Techniques For Bird’s Nest Fern
- 14 Propagation Methods For Bird’s Nest Fern
- 15 Troubleshooting Problems With Planting Bird’s Nest Fern Indoors
- 16 Conclusion
- 17 FAQS
What Is Bird’s Nest Fern?
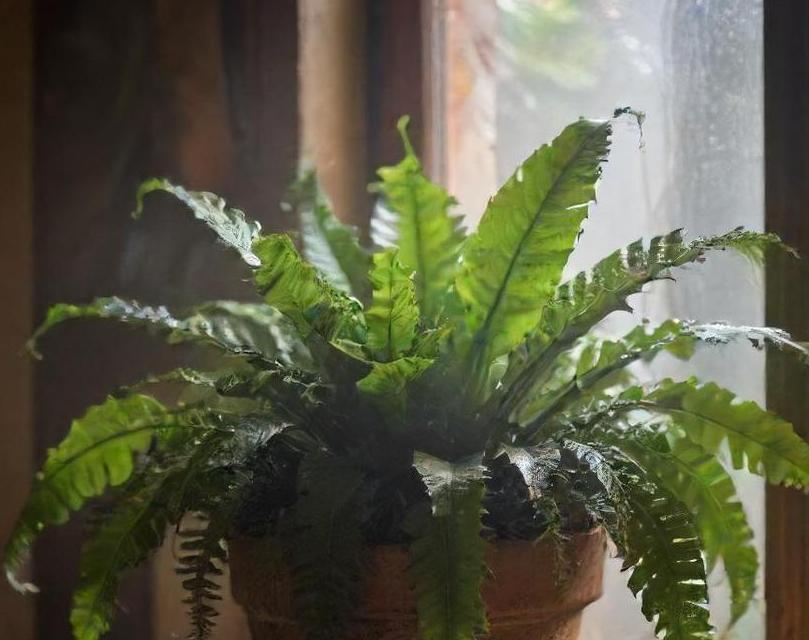
Asplenium nidus, commonly known as Bird’s Nest Fern, is a member of the Aspleniaceae family, native to tropical regions of Southeast Asia, Australia, and the Pacific Islands. Unlike its name suggests, Bird’s Nest Fern is not a flowering plant but rather a type of fern characterized by its large, wavy, glossy fronds that grow in a rosette pattern, resembling a bird’s nest.
This fern is favored for its elegant, arching leaves that can reach lengths of up to three feet. The foliage emerges from a central rosette, gradually unfurling to reveal a vibrant green hue. Bird’s Nest Fern is well-suited for indoor cultivation, thriving in low-light conditions and requiring minimal care, making it an excellent choice for novice plant enthusiasts.
Botanical Characteristics
Morphology
Bird’s Nest Fern exhibits distinctive botanical characteristics that set it apart from other fern species. The fronds are broad, strap-like, and glossy, with undulating edges that give them a graceful appearance. The leaves arise from a central point, forming a circular arrangement reminiscent of a nest, hence the plant’s common name.
The fronds can vary in size, ranging from small, compact rosettes in juvenile plants to larger, more expansive foliage in mature specimens. As the fronds age, they may develop a slightly leathery texture, adding to the plant’s ornamental appeal.
Growth Habit
In its natural habitat, Bird’s Nest Fern typically grows as an epiphyte, meaning it attaches itself to trees or rocks without parasitizing them. This unique growth habit allows the fern to absorb moisture and nutrients from the air and surrounding debris, rather than relying on soil.
When cultivated indoors, Bird’s Nest Fern adapts well to container gardening, thriving in well-draining potting mixtures that mimic its preferred epiphytic environment. The plant’s shallow root system makes it suitable for small to medium-sized pots, although it may require occasional repotting as it grows.
Reproduction
Like other ferns, Bird’s Nest Fern reproduces via spores rather than seeds. The underside of the fronds contains structures called sori, which produce and release spores for propagation. While indoor specimens may occasionally produce spores, propagation is more commonly achieved through division.
Dividing a mature Bird’s Nest Fern involves carefully separating the rhizomes, ensuring that each division has sufficient roots and foliage to sustain growth. Divided segments can be potted individually and kept in a warm, humid environment until they establish roots and begin to grow.
Historical And Cultural Significance
Traditional Uses
Throughout history, ferns have held cultural significance in various societies, often symbolizing resilience, rebirth, and prosperity. In many cultures, ferns were believed to possess mystical properties and were used in rituals and ceremonies.
Bird’s Nest Fern, with its striking appearance and robust growth habit, has been revered in traditional medicine and folklore. In some indigenous cultures, extracts from the fern were used to treat ailments ranging from skin conditions to respiratory infections. While modern medicine has largely replaced these traditional remedies, Bird’s Nest Fern continues to be appreciated for its aesthetic value and symbolic significance.
Ornamental Value
In addition to its cultural significance, Bird’s Nest Fern has long been prized for its ornamental value. The plant’s lush foliage and graceful form make it a popular choice for interior landscaping, adding a touch of tropical elegance to homes, offices, and public spaces.
During the Victorian era, ferns experienced a surge in popularity as houseplants, with enthusiasts collecting and cultivating a wide array of fern species, including Bird’s Nest Fern. The advent of botanical gardens and horticultural societies further fueled interest in fern cultivation, leading to the development of new varieties and cultivars.
Common Names And Varieties
Common Names
Bird’s Nest Fern is known by various common names in different regions and languages. In addition to its scientific name, Asplenium nidus, the fern is often referred to as the nest fern, wild bird’s nest fern, or simply bird’s nest. These names allude to the plant’s distinctive growth habit and appearance, evoking images of a cozy avian dwelling nestled among the foliage.
Varieties
While Asplenium nidus is the most widely recognized species of Bird’s Nest Fern, several cultivars and varieties have been developed for horticultural purposes. These varieties may exhibit subtle differences in leaf shape, size, or coloration, offering enthusiasts a diverse selection to choose from.
‘Crispy Wave’
One of the most popular cultivars is Asplenium nidus ‘Crispy Wave’, prized for its deeply corrugated fronds that resemble ocean waves. This variety is known for its exceptional vigor and resilience, making it an excellent choice for both indoor and outdoor cultivation.
‘Victoria’
Another notable variety is Asplenium nidus ‘Victoria’, distinguished by its compact growth habit and vibrant green foliage. This cultivar is well-suited for smaller spaces and makes a stunning accent plant in gardens or container arrangements.
‘Osaka’
Asplenium nidus ‘Osaka’ is a compact variety with gracefully arching fronds and a distinctive upright growth habit. This cultivar is prized for its ornamental appeal and is often used as a focal point in tropical-themed landscapes or indoor gardens.
Bird’s Nest Fern is a captivating indoor plant known for its elegant foliage, easy care requirements, and cultural significance. With its lush, wavy fronds and distinctive growth habit, this fern adds a touch of tropical charm to any interior space. Whether grown as a standalone specimen or incorporated into mixed plantings, Bird’s Nest Fern is sure to delight enthusiasts with its beauty and resilience. By understanding its botanical characteristics, historical significance, and common varieties, plant lovers can appreciate the unique charm of this beloved fern species.
Light Requirements
The Bird’s Nest Fern, scientifically known as Asplenium nidus, is a captivating plant known for its lush, vibrant fronds and distinctive nest-like growth pattern. Native to tropical regions such as Southeast Asia, Australia, and Hawaii, this fern has gained popularity as a cherished indoor plant due to its low maintenance requirements and striking appearance. Its name is derived from the nest-like shape formed by its broad, arching fronds, which unfurl gracefully from a central rosette.
Bird’s Nest Ferns thrive in bright, indirect light conditions, mimicking the dappled sunlight found beneath the canopy of tropical forests. While they appreciate ample light, direct sunlight can scorch their delicate fronds, leading to unsightly browning or yellowing. Therefore, it’s essential to place your fern in a location where it can enjoy filtered sunlight or indirect light, such as near a north or east-facing window. If natural light is limited in your space, you can supplement with artificial grow lights specifically designed for indoor plants. Position the lights above the fern, maintaining a distance of around 12 to 18 inches to prevent heat damage.
Observing your fern’s response to its light environment is crucial for ensuring optimal growth. If the fronds appear pale or leggy, it may indicate insufficient light, while scorched or wilted foliage suggests excessive sun exposure. Adjust the plant’s placement accordingly to provide the ideal balance of light for healthy growth.
Soil Requirements
Providing the right soil mixture is paramount for the well-being of your Bird’s Nest Fern. This species thrives in a well-draining, moisture-retentive medium that mimics the nutrient-rich forest floor of its native habitat. A high-quality potting mix formulated for ferns and other tropical plants is ideal, as it offers the necessary aeration and moisture retention properties.
A typical fern potting mix consists of a blend of ingredients such as peat moss, perlite, pine bark, and coarse sand. This combination ensures proper drainage while retaining sufficient moisture to keep the roots hydrated. Avoid using heavy soils or those prone to compaction, as they can lead to waterlogged conditions that may cause root rot.
When repotting your Bird’s Nest Fern, choose a container with adequate drainage holes to prevent water from pooling at the roots. Transplanting is typically necessary every two to three years or when the plant outgrows its current pot. During the repotting process, gently loosen the root ball and place it in the new container, adding fresh potting mix around the sides while ensuring the plant sits at the same level as before.
Temperature Requirements
Maintaining the appropriate temperature range is essential for the health and vitality of your Bird’s Nest Fern. As a tropical plant, it thrives in warm, humid conditions reminiscent of its native environment. Ideally, aim to keep the ambient temperature between 60°F to 80°F (15°C to 27°C) year-round, avoiding sudden fluctuations or extremes.
During the growing season, which typically spans spring through early fall, provide slightly warmer temperatures on the higher end of the spectrum to encourage robust growth. In contrast, slightly cooler temperatures in the range of 60°F to 70°F (15°C to 21°C) are suitable during the winter months when growth slows.
Protect your fern from drafts, whether from air conditioning vents, heaters, or doors and windows. Cold drafts can shock the plant and lead to stress or decline, while hot, dry air can cause dehydration and leaf damage. Positioning the fern away from sources of temperature fluctuations helps maintain a stable environment conducive to its well-being.
Humidity Requirements
Humidity is a critical factor in the care of Bird’s Nest Ferns, as they originate from humid, tropical climates where moisture levels are consistently high. Indoor environments, especially those with central heating or air conditioning, often have low humidity levels that can adversely affect ferns, leading to dry, crispy foliage and diminished growth.
To replicate the humid conditions that Bird’s Nest Ferns thrive in, there are several strategies you can employ:
-
Misting: Regularly misting the foliage with room-temperature water helps increase humidity around the plant. Aim to mist in the morning to allow excess moisture to evaporate throughout the day, reducing the risk of fungal diseases.
-
Humidifiers: Using a humidifier in the vicinity of your fern can elevate indoor humidity levels, creating a more favorable environment. Place the humidifier nearby, but ensure it doesn’t directly blow air onto the plant to avoid waterlogging.
-
Pebble Tray: Placing the fern’s pot on a tray filled with water and pebbles creates a humid microclimate around the plant as the water evaporates. Ensure the bottom of the pot doesn’t sit in the water to prevent root rot.
-
Grouping Plants: Grouping several indoor plants together can increase humidity levels collectively through transpiration, benefiting all the plants involved.
Consistently monitoring humidity levels with a hygrometer allows you to adjust your strategies as needed to maintain the optimal range of 50% to 70% relative humidity for your Bird’s Nest Fern.
The Bird’s Nest Fern is a stunning and resilient plant that can thrive as a cherished addition to your indoor space when provided with the appropriate care. By understanding its light, soil, temperature, and humidity requirements, you can create an environment that mimics its native habitat, fostering robust growth and vibrant foliage. Remember to place your fern in bright, indirect light, use a well-draining potting mix, maintain moderate temperatures, and provide ample humidity to ensure its well-being. With proper attention and care, your Bird’s Nest Fern will reward you with its graceful beauty and lush foliage, bringing a touch of the tropics into your home or office environment for years to come.
Watering Needs For Bird’s Nest Fern
Asplenium nidus, commonly known as the Bird’s Nest Fern, is a tropical plant native to Southeast Asia, Australia, and East Africa. Its distinctive appearance, characterized by long, wavy fronds emerging from a central rosette, makes it a striking addition to any indoor space. Unlike some fern species, the Bird’s Nest Fern is relatively easy to care for, making it an ideal choice for both novice and experienced plant enthusiasts.
One of the most appealing features of the Bird’s Nest Fern is its adaptability to indoor environments with low light levels. While it thrives in indirect sunlight, it can also tolerate shady conditions, making it suitable for areas of the home that receive minimal natural light. Additionally, this fern prefers high humidity, making it an excellent candidate for bathrooms or kitchens where moisture levels tend to be higher.
Beyond its aesthetic appeal, the Bird’s Nest Fern also offers air-purifying properties, helping to remove toxins such as formaldehyde and xylene from indoor air. This makes it a valuable addition to any indoor environment, particularly in urban areas where air quality may be a concern.
Proper watering is essential for the health and vitality of Bird’s Nest Ferns. While these plants prefer consistently moist soil, they are susceptible to root rot if overwatered. Conversely, allowing the soil to dry out completely can cause stress to the plant and lead to wilting or leaf loss.
The key to watering a Bird’s Nest Fern is to maintain evenly moist soil without allowing it to become waterlogged. To achieve this balance, it’s essential to water the plant thoroughly when the top inch of soil feels dry to the touch. Ensure that water drains freely from the pot to prevent water from pooling around the roots.
During the growing season, typically spring and summer, Bird’s Nest Ferns may require more frequent watering to support their active growth. In contrast, watering frequency can be reduced during the winter months when the plant’s growth slows. However, it’s crucial to monitor soil moisture levels carefully and adjust watering frequency as needed based on environmental conditions.
To provide additional humidity, especially in drier indoor environments, misting the foliage of the Bird’s Nest Fern or placing a humidity tray filled with water and pebbles beneath the plant can help maintain optimal moisture levels.
Fertilization
While Bird’s Nest Ferns are not heavy feeders, occasional fertilization can promote healthy growth and vibrant foliage. During the growing season, which typically spans from spring to early fall, applying a balanced liquid fertilizer diluted to half strength every four to six weeks can provide the necessary nutrients.
When selecting a fertilizer for your Bird’s Nest Fern, opt for a balanced formula with equal parts nitrogen, phosphorus, and potassium (NPK). This will support overall plant health and encourage lush foliage growth. Avoid over-fertilizing, as excessive nutrients can lead to salt buildup in the soil, potentially damaging the plant’s roots.
Before applying fertilizer, ensure that the soil is moist to prevent root burn. Water the plant thoroughly a day or two before fertilizing to ensure proper absorption of nutrients. Additionally, always follow the manufacturer’s instructions regarding application rates and frequency to avoid inadvertently harming your fern.
During the dormant winter months, it’s best to withhold fertilizer as the plant’s growth slows, resuming fertilization in spring as new growth emerges.
How To Plant Bird’s Nest Fern
Planting a Bird’s Nest Fern involves several steps to ensure optimal growth and establishment. Whether you’re starting with a young fern or repotting a mature plant, the following guidelines will help you achieve success.
Selecting A Container
Choose a container with drainage holes to prevent water from accumulating around the roots, which can lead to root rot. The size of the pot should accommodate the size of the fern, with a few inches of space around the root ball to allow for future growth.
Preparing The Soil
Bird’s Nest Ferns thrive in well-draining, moisture-retentive soil that is rich in organic matter. A mixture of peat moss, perlite, and pine bark or coconut coir works well for these ferns. Avoid heavy or compacted soils that can retain too much moisture, as this can lead to root rot.
Planting The Fern
- Begin by partially filling the bottom of the pot with potting mix, creating a mound in the center to support the fern’s root ball.
- Carefully remove the Bird’s Nest Fern from its existing container, gently teasing apart any tangled roots.
- Place the fern in the center of the pot, ensuring that the top of the root ball sits slightly below the rim of the container.
- Fill in the remaining space around the root ball with potting mix, gently pressing down to secure the plant in place.
- Water the newly planted fern thoroughly to settle the soil and eliminate any air pockets around the roots.
Placement And Care
After planting, place the Bird’s Nest Fern in a location with indirect sunlight or dappled shade, avoiding direct exposure to harsh midday sun. Maintain consistent moisture levels in the soil, watering when the top inch feels dry to the touch. Additionally, provide adequate humidity by misting the foliage regularly or placing the plant near a humidifier.
Potting

Repotting is an essential aspect of Bird’s Nest Fern care, allowing the plant to access fresh soil and nutrients while providing room for root expansion. Here’s how to repot a Bird’s Nest Fern successfully:
Signs It’s Time To Repot
- Roots protruding from the drainage holes
- Soil drying out quickly after watering
- Crowded root ball, causing the plant to become root-bound
- Decline in growth or overall health of the fern
Steps For Repotting
- Choose a slightly larger pot with drainage holes than the current container to accommodate the fern’s growing root system.
- Carefully remove the fern from its current pot, gently loosening the roots and inspecting for any signs of damage or disease.
- Prepare the new pot by adding a layer of fresh potting mix to the bottom, creating a mound to support the fern’s root ball.
- Place the fern in the center of the new pot, ensuring that the top of the root ball sits slightly below the rim of the container.
- Fill in the remaining space around the root ball with fresh potting mix, gently pressing down to secure the plant in place.
- Water the newly repotted fern thoroughly to settle the soil and hydrate the roots.
Aftercare
After repotting, place the Bird’s Nest Fern in its preferred location, ensuring it receives adequate indirect sunlight and consistent moisture levels. Monitor the plant closely for signs of stress, such as wilting or yellowing leaves, and adjust watering frequency as needed to promote recovery.
The Bird’s Nest Fern is a captivating indoor plant known for its lush foliage, low maintenance requirements, and air-purifying properties.
Characteristics Of Bird’s Nest Fern
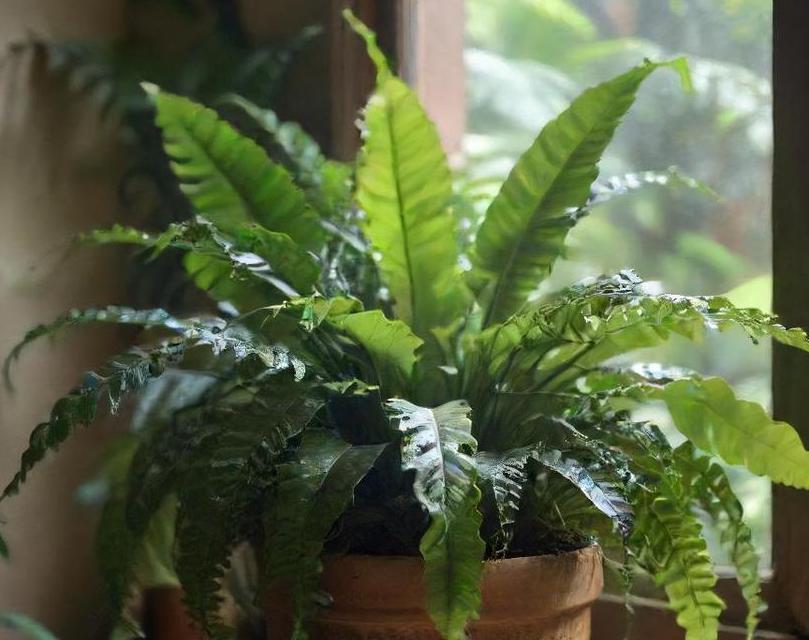
The Bird’s Nest Fern (Asplenium nidus) is a stunning tropical plant that has gained immense popularity as an indoor plant. Originating from the rainforests of Asia, Australia, and Africa, this fern is renowned for its lush, glossy fronds that resemble a bird’s nest, hence its name. With its vibrant green foliage and unique growth habit, the Bird’s Nest Fern adds a touch of exotic elegance to any indoor space.
The Bird’s Nest Fern is characterized by its rosette of large, wavy fronds that grow from a central point, giving it the appearance of a nest. These fronds can reach lengths of up to several feet, creating a dramatic and eye-catching display. Unlike some other ferns, the Bird’s Nest Fern does not produce traditional leaves but instead has modified fronds that serve both photosynthetic and reproductive functions.
One of the key features of the Bird’s Nest Fern is its ability to thrive in low-light conditions, making it an excellent choice for indoor cultivation. Additionally, this fern prefers high humidity levels, which can often be replicated indoors with the use of a humidifier or by placing the plant in a bathroom or kitchen where humidity levels tend to be higher.
Pruning Techniques For Bird’s Nest Fern
Pruning is an essential aspect of caring for Bird’s Nest Ferns, as it helps to maintain the plant’s health and appearance. Here are some pruning techniques to keep your fern looking its best:
Removal Of Dead Or Yellowing Fronds
Regularly inspect your Bird’s Nest Fern for any dead or yellowing fronds and promptly remove them to prevent the spread of disease and improve the overall appearance of the plant. Use clean, sharp scissors or pruning shears to make clean cuts at the base of the frond where it meets the central rosette.
Trimming Brown Tips
Bird’s Nest Ferns are sensitive to dry air and can develop brown tips on their fronds as a result. To remedy this, use sharp scissors to trim off the browned portions of the fronds, taking care to make clean cuts without damaging the healthy tissue. Additionally, consider increasing humidity levels around the plant to prevent further browning.
Shaping And Thinning
Periodically, you may need to trim back overgrown fronds or thin out dense growth to maintain the desired shape and size of your Bird’s Nest Fern. Use pruning shears to selectively remove excess growth, focusing on maintaining a balanced and symmetrical appearance.
Division
As Bird’s Nest Ferns mature, they may become crowded in their pots, leading to competition for resources and diminished growth. To alleviate this, consider dividing your fern into smaller plants and repotting them individually. Carefully separate the root mass into smaller sections, ensuring that each division has sufficient roots and foliage to support its growth.
Propagation Methods For Bird’s Nest Fern
Propagation is a rewarding way to expand your collection of Bird’s Nest Ferns and share them with friends and fellow plant enthusiasts. While this fern can be propagated through spores, it is more commonly propagated through division or by using offsets, also known as pups. Here are some methods for propagating Bird’s Nest Ferns:
Division
Division is perhaps the simplest and most reliable method of propagating Bird’s Nest Ferns. To divide your fern, carefully remove it from its pot and gently separate the root mass into smaller sections, ensuring that each division has both roots and foliage. Repot the divisions into separate containers filled with well-draining potting mix, and water them thoroughly to encourage root establishment.
Offsets
Bird’s Nest Ferns produce offsets, or pups, at the base of the plant, which can be carefully separated and propagated into new plants. To propagate using offsets, first identify healthy pups that have their own root system emerging from the base of the parent plant. Carefully detach the offsets from the parent plant using a sharp, clean knife or scissors, taking care to preserve their roots. Plant the offsets in individual pots filled with potting mix, and provide them with the same care as mature plants.
Spore Propagation
While less common, Bird’s Nest Ferns can also be propagated from spores collected from mature fronds. To propagate from spores, collect ripe spores from the undersides of mature fronds and sow them onto a moist growing medium, such as peat moss or a mixture of sphagnum moss and perlite. Cover the tray with plastic wrap to create a humid environment and place it in a warm, well-lit location. With time and patience, the spores will germinate and develop into young ferns that can be transplanted into individual pots.
Troubleshooting Problems With Planting Bird’s Nest Fern Indoors
While Bird’s Nest Ferns are relatively easy to care for, they can still encounter issues when grown indoors. Here are some common problems and their solutions:
Yellowing Or Browning Fronds
Yellowing or browning fronds are often a sign of either overwatering or underwatering. Ensure that your Bird’s Nest Fern is receiving the right amount of water by allowing the top inch of soil to dry out slightly between waterings. Additionally, check the humidity levels around the plant, as low humidity can also cause frond discoloration. Trim away any damaged fronds and adjust your watering and humidity practices accordingly.
Pest Infestations
Bird’s Nest Ferns are susceptible to pests such as scale insects, mealybugs, and spider mites, especially when grown indoors. Inspect your fern regularly for signs of pest infestation, such as small insects, webbing, or sticky residue on the leaves. If pests are detected, treat the plant with an appropriate insecticidal soap or neem oil solution, taking care to thoroughly coat the foliage and stems. Repeat the treatment as necessary until the infestation is under control.
Root Rot
Overwatering can lead to root rot, a fungal disease that causes the roots of the plant to decay and die. To prevent root rot, ensure that your Bird’s Nest Fern is planted in a well-draining potting mix and that excess water is allowed to drain away freely from the roots. Avoid watering the plant excessively and remove any standing water from the saucer or tray beneath the pot. If root rot is detected, trim away any affected roots and repot the plant into fresh, dry soil.
Insufficient Light
While Bird’s Nest Ferns prefer low to moderate light conditions, they still require some indirect sunlight to thrive. If your fern is not receiving enough light, it may become leggy and pale in color. Place the plant near a window where it can receive bright, indirect light for several hours a day, but avoid exposing it to direct sunlight, which can scorch the delicate fronds. Alternatively, supplement natural light with artificial grow lights to ensure adequate light levels for healthy growth.
Conclusion
The Bird’s Nest Fern is a beautiful and versatile plant that can thrive indoors with the right care and attention. By following proper pruning techniques, propagation methods, and troubleshooting tips, you can enjoy the lush greenery and unique beauty of this tropical fern in your home or office. Whether you’re a seasoned plant enthusiast or a beginner gardener, the Bird’s Nest Fern is sure to delight with its graceful fronds and easygoing nature.
FAQS
What Is A Bird’s Nest Fern?
Bird’s Nest Fern (Asplenium nidus) is a popular indoor plant known for its distinctive, nest-shaped rosette of fronds. Native to tropical regions, it thrives in humid environments and makes an excellent choice for indoor gardening due to its low maintenance requirements and attractive foliage.
How Do I Care For A Bird’s Nest Fern?
Bird’s Nest Ferns prefer indirect light, so placing them near a north or east-facing window is ideal. Keep the soil consistently moist but not waterlogged, and ensure good drainage to prevent root rot. Regular misting or placing the plant on a pebble tray can help maintain humidity levels. Avoid direct sunlight, as it can scorch the delicate fronds.
What Type Of Soil Is Best For Bird’s Nest Fern?
A well-draining, rich potting mix with organic matter such as peat moss or compost is ideal for Bird’s Nest Ferns. A mix specifically formulated for ferns or tropical plants works well. Make sure the soil retains moisture without becoming waterlogged, as soggy conditions can lead to root rot.
How Often Should I Fertilize My Bird’s Nest Fern?
During the growing season (spring and summer), fertilize your Bird’s Nest Fern every 4-6 weeks with a balanced liquid fertilizer diluted to half strength. Reduce fertilization frequency or halt altogether during the dormant period in fall and winter. Over-fertilizing can cause fertilizer burn and damage the plant, so it’s important to follow recommended dosage guidelines.
Can I Propagate My Bird’s Nest Fern?
Yes, Bird’s Nest Ferns can be propagated through division or spores. To divide the plant, carefully separate the offshoots from the main plant, ensuring each division has roots attached. Plant the divisions in pots with well-draining soil and keep them consistently moist until new growth appears. Propagation through spores requires patience as it involves collecting and sowing spores on a suitable medium, then waiting for them to germinate and grow into new plants.
Are There Any Common Pests Or Diseases That Affect Bird’s Nest Ferns?
While Bird’s Nest Ferns are relatively resistant to pests and diseases, they can occasionally suffer from issues like mealybugs, scale insects, or fungal diseases if growing conditions are unfavorable. Regularly inspect the plant for signs of pests or disease, and treat promptly with insecticidal soap or fungicide if necessary. Maintaining proper humidity levels and avoiding overwatering can help prevent these problems.
How Do I Prune My Bird’s Nest Fern?
Pruning Bird’s Nest Ferns is mainly about removing dead or damaged fronds to maintain the plant’s appearance and health. Use clean, sharp scissors or pruning shears to carefully trim away any yellowing or brown fronds at the base where they connect to the main stem. Avoid cutting into healthy green foliage, as this can harm the plant. Regular pruning encourages new growth and keeps the plant looking tidy.